─── 🖊⋅🖊⋅🖊 ───
I’ve been messing around with my self-hosted setup for a while (I have a lot of machines). I noticed that I’m starting to cross the line between “things that are necessary” and “I’m just nitpicking and adding things for the details”, so it’s finally time to put a pin on this first iteration.
Connecting to the internet
I bought a Cloudflare domain just for this.
Cloudflare tunnels
Probably the safest and most straightforward method to exposing a container to the internet on your domain. There are two ways to do this:
- Each service has its own tunnel by adding the cloudflared container to each docker compose.
- With Dockflare, use one tunnel and the API to create or delete DNS records pointing to different services, also managed through the docker compose.
With Cloudflare, you can use their zero trust and their proxying to handle DDOS attacks, and restrict by IP, email, etc. However, you CANNOT do a Minecraft server because it needs raw TCP traffic, while Cloudflare will wrap it and the protocol is incompatible. In general, this method works best for web interfaces that you want in a trusted third-party tunnel.
Useful resources
Bore.pub
I tried out ekzhang/bore and bought a VPS to tunnel it to. For this, you set up a publicly available server (VPS) and start the bore listener (good to set up a secret password here too). Then on your local computer, run the cli command to “bore” your service via TCP to the VPS. It’s very simple and meant for temporary connections, so I had security concerns that made this not feasible. Good for prototyping!
For a regular website subdomain, you would have to redirect traffic with a reverse proxy like nginx in order to visit sub.domain.com and arrive at what is technically being bore’d as domain.com:8080 or something.
Pangolin
Pangolin1 is like a self-hosted Cloudflare tunnels. On the VPS, set up the host and the Wireguard VPN network. Then, set up agents which are basically just adding to the Wireguard network. Via Wireguard, the public VPS accesses your services and posts them on a URL.
Pros: no reverse proxying, and the UI is cleaner and better than Cloudflare.
Cons: VPS becomes a major security threat surface.
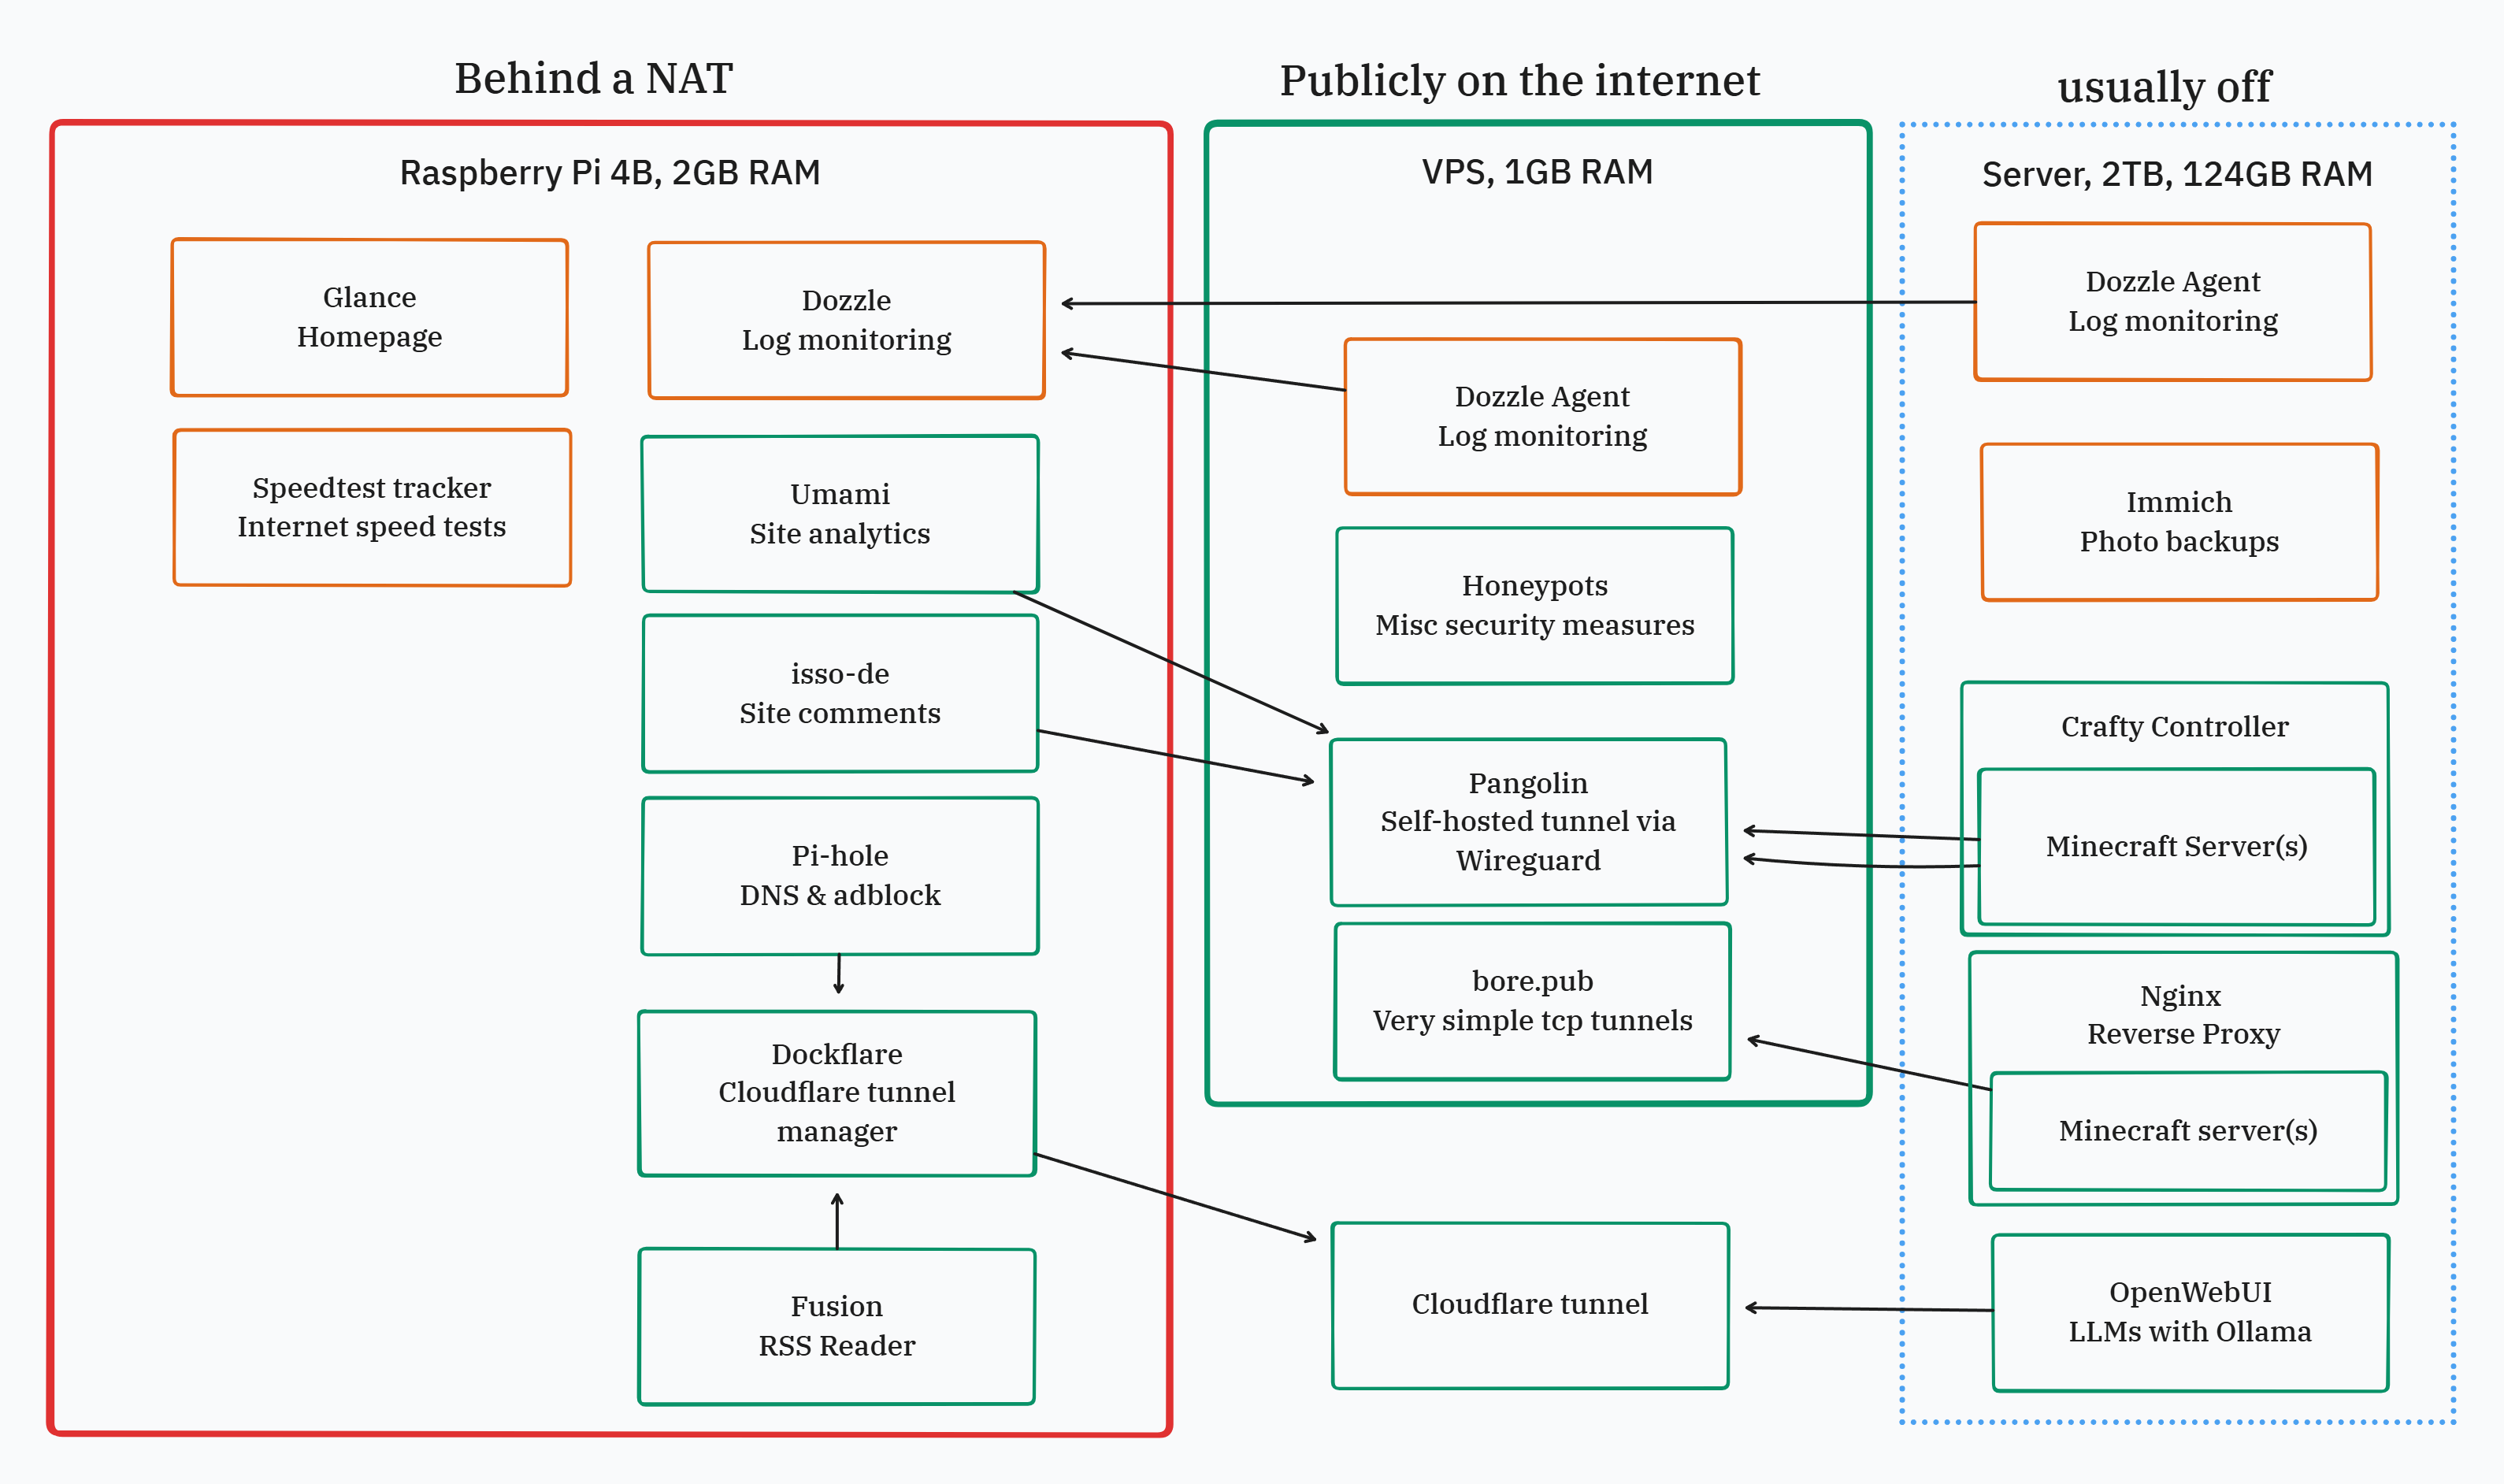
The devices
- Raspberry Pi
This is always on. Any service that is lightweight and needs maximum uptime is hosted here.
- VPS with Racknerd
Since my ISP (internet service provider) puts my entire system behind a NAT, tunneling to a public VPS is the only way to expose things to the internet. I don’t plan on running anything on this VPS, so I went with the lowest RAM and CPU available here. I have minimal services running here, and put the most security measures into this one.
- The overkill retired server workstation
It’s great that I have one of these, but it’s causing me some issues - I think it’s because of some janky wifi things. Also, I’m sure it takes up a lot of electricity. I’m thinking of turning it on to mass-upload some photos every once in a while (Immich backup), and for 1-month bursts of playing a certain Minecraft server or something.
The quests
I don’t even use these, but in my mind, they’re like a server’s rite of passage.
ssh key hate to see me coming
Unfortunately this is the safest way to go about SSH-ing into a server.2 This is especially important for the VPS, where I notice in the ssh logs that random IPs have been trying out various usernames (admin, ubuntu, root, etc) to log into my server. I originally was a bit intimidated by the process, but it’s actually very easy and there are plenty of guides. Also, if you can’t learn to secure your server in this most basic form, you have no business putting yourself on the distributed internet.
Similarly good to set up fail2ban and ufw.
Minecraft server
There are a few approaches that are possible with this, but I finally settled on my chosen method: Pangolin + CraftyController + SRV domain records. This allows me to easily set up and control my servers (CraftyController), and then expose them to the internet (Pangolin), and set up a vanity domain like mc.domain.com. What a flex!
This is running on my overpowered workstation for all the RAM and memory available. It should be able to happily handle multiplayer Minecraft.
A new hostname
I can now ssh into my VPS with the hostname which points to the IP with an A record. In the Linux server, change the host name with hostnamectl.3
Self-hosted Ollama with OpenWebUI
This is probably the easiest way to get a chatbot up.4 Apparently it’s good to use a GPU even if it’s old. With this, you can bundle in Ollama as a container in the docker compose. In general, you could probably also expose the port that Ollama is running on to the internet and query it in that way. I’m happy with locally hosting my Ollamas though - compute power is expensive!!! There was this (sad but hilarious) story about how someone discovered that their publicly exposed instance was being used by a scammer to generate text for their operation.
Let’s discuss…
- Trusting an external service vs self-hosting the whole stack: VPN, tunnel
- Constantly tweaking and debugging the setup
- New utilities and tools that I’ve learned ⇒ how would I put that on a resume
- Version control, 3-2-1 backups, and hardware longevity
I had a great time setting up the whole system! It was a lot of continuous late nights stitched together. I kept saying, “I’m 20% done. I’m 80% done. I’m 95% done.” But are we ever really done? I’m excited for the various possibilities that are unlocked by having this setup available to me.
Big shoutout to r/selfhosted which has been a great place to find cool services to set up, and tips from old threads. As always, thank you to Perplexity for helping me debug literally everything (despite the varying degrees of success).
Footnotes
─── 🖊⋅🖊⋅🖊 ───